
1. About
You’re reading this either because you’ve decided that InventoryIQ is the best inventory solution for you (good choice!), or because you want to know more about it. If you’re still not sure which inventory method is best for your business, head over to How to choose your COGS tracking method in Finaloop.
InventoryIQ gives you super control over managing inventory and ensures that your books reflect COGS, stock balances, and stock values on a SKU level and a warehouse level. You can also watch this short video to introduce you to the benefits and key features of InventoryIQ:
Because there’s quite a bit to go through, we’ve split the article into bite-sized chunks. Take it easy! It’s an article you might want to come back to for a refresher!
2. Key inventory terms
Before we dive into what’s involved in using InventoryIQ, here’s a refresher of some key inventory terms.
Inventory transaction status
Inventory transaction status
Inventory items can have one of three statuses and because POs can arrive in multiple shipments, each shipment has its own status.
In process: Inventory is marked as In process when you add a production date to your PO. The production date is the date the vendor confirmed your order and has started to process it. The Balance Sheet lists these items as ‘Inventory in process'.

In transit: The vendor has shipped the inventory but you haven’t yet received it. The Balance Sheet lists these items as ‘Inventory in transit’.
Received: When you mark a shipment as received, the Balance Sheet lists the items as ‘Inventory’.
Accurate tracking of the inventory status is a key component of how we track which units were received first and how we calculate your COGS on a first-in first-out (FIFO) basis.
Landed cost
Landed cost
When you create a PO, you’ll add the direct cost of each inventory item. Then you add indirect costs and discounts, as relevant, to get a more accurate picture of the actual costs of your inventory at the unit level, also known as your landed cost.
The landed cost tells you the exact cost each unit of a given SKU cost you. One of the key benefits of using InventoryIQ is that, despite the constantly fluctuating nature of these costs, we’ll automatically track the landed cost for each item.
For each inventory item (SKU), the landed cost is the direct cost of inventory items purchased + indirect costs for those items / number of inventory items.
Here’s an example.
You purchase 100 units of Product A: $2,000
Shipping and other indirect costs for those inventory items: $500
The landed cost per unit is (2000+500)/100 = $25.
When creating a PO, indirect costs are allocated automatically between the products based on the cost, unless you choose to allocate them manually.
By default, auto-allocation is ON but you can turn it OFF.
With auto-allocation OFF, you can allocate the indirect costs by another method such as, by weight or volume.
But when it’s ON, Finaloop does the hard work for you. We apportion the indirect costs and generate landed costs per unit automatically.
Indirect costs include any additional costs incurred to get the inventory to your warehouse that are not related to the direct costs of the items themselves. Here’s the list of indirect cost types / categories:
Other inventory indirect costs / general
Shipping
Vendor fees
Duties and tax
Custom fees and services
Insurance
Allocated production costs
Pallet costs
Shipping surcharge
Vendor discounts
To learn more specifics about creating and managing POs in Finaloop, check out article Managing POs in Finaloop and for more on landed costs, head over to How do I calculate my landed cost?
FIFO
FIFO
FIFO stands for first-in first-out. InventoryIQ uses the FIFO method to calculate the value of inventory items on any given date.
When you sell products, Finaloop uses the cost of the items (based on the PO) that have been in your warehouse the longest. When there is no more stock from that PO, Finaloop takes the costs from the next PO and so on - always starting from the first PO that you created for that item.
Example:
April 1: PO #0001. You receive 10 items to your warehouse. Unit cost = $10.
May 12: PO #0026. You receive 20 items to your warehouse. Unit cost = $10.50.
May 15: You sell 15 items.
InventoryIQ records this as a stock reduction of 15 items: 10 priced at $10 and 5 priced at $10.50.
As you purchase items, the stock numbers and values in the Balance Sheet increase and when you sell, they decrease and instead become COGS.
Vendor rolling balance
Vendor rolling balance
The Vendors tab shows the total amount owed to vendors. It shows the rolling balance and any unpaid bills.

The rolling balance is the amount you owe a vendor for a PO when you haven’t received an official bill from them. The rolling balance calculation is POs + Stock transfer costs + Assembly costs - inventory bills issued by the vendor - payments (excluding payments for bills).
Whether you track the amount owed to your vendors through a rolling balance or through actual bills, the total amount owed to the vendor remains the same until you actually pay the vendor.
NOTE: If you record an extra payment or bill that isn't related to a PO, you could create a negative rolling balance indicating that you are either missing a PO, the numbers on your PO or bill aren’t accurate, or that you overpaid your vendor! It may also be related to the incorrect categorization of a transaction or bill. If you see a negative vendor balance (indicated in red), check your POs to ensure your numbers are accurate.

3. Setup and manage warehouses
The first step is to set up warehouses and choose a default warehouse for each sales channel. This allows us to track stock per warehouse.
We’ll walk through the basics of managing your warehouses here.
Overview of setting up & managing warehouses
Overview of setting up & managing warehouses
Using InventoryIQ, you can add / manage your warehouses via Inventory>Settings>Warehouses.
Warehouses synced automatically through your integrated channels are listed on the Warehouse page or you can add them manually. Here’s an example.
Edit button (#1)
Shows the channel source (#2)
Set as the default warehouse (#3)
> To add a warehouse manually:
Navigate to Inventory>Settings>Warehouses.
Click Add Warehouse and complete the details.
Name: Ensure the warehouse name is unique otherwise Finaloop can’t track COGS correctly.
Complete the other details.
The warehouse is Active by default. Set the toggle to OFF only if you no longer record sales, fulfillments or stock at that location - see the notes in the section Inactive warehouses.
Click Save. The warehouse is now added to the list of warehouses.
Set default warehouses
You can set a default warehouse for each sales channel. If there is no default set for a particular sales channel, Finaloop pulls orders from the general default warehouse.
>To create a default warehouse for a sales channel:
Navigate to Inventory>Settings>Warehouses.
Click Edit defaults to open the defaults pane.
Select the channel and the warehouse as the default.
Click Save.
Click +Add to add separate default warehouses for each channel.
Note: If you are selling through Amazon FBA, create a separate warehouse called ‘Amazon FBA’ and set that as a default. We use this as a virtual warehouse to track your FBA sales and quantities.
Inactive warehouses
Generally warehouses are active, but you can make them inactive. There are few things to note about inactive warehouses:
Inactive warehouses don’t show on filters or in menus (with the exception of warehouses that have had activity during the year). This means that you can't manage or transfer inventory in inactive warehouses.
Before you mark a warehouse as inactive, make sure you complete all orders and transfers that are assigned to it, or reassign them to another location.
Default warehouses cannot be inactive.
4. Create opening balances for each SKU
Because we’re tracking inventory costs and movements at the SKU and warehouse level, Finaloop needs the opening inventory balance for each SKU in each warehouse, including the number of units and the average cost per unit. All opening inventory balances are the closing balances for the previous tax year before you joined Finaloop.
To create opening balances for each SKU:
To create opening balances for each SKU:
Navigate to Inventory>Settings>Opening balance.
You’ll see a list of each SKU with data pulled automatically from Shopify and Amazon. You can also create new products or duplicate products to add warehouses.
Add the quantities and average cost per unit for each SKU and warehouse.
To bulk edit multiple products at once, select the specific products, then click Action>Bulk edit and enter the updated data.
You can also bulk upload all opening balances in one shot. Click Actions>Import CSV. Follow the instructions on screen to set up the .CSV with the accurate data.
Now, your opening balances are all set!
5. Create Purchase Orders (POs)
Now that you’ve set up warehouses and have opening balances for each SKU , the next piece is to create POs for every inventory purchase.
POs are the cornerstone of how Finaloop calculates COGS and inventory. We use POs to determine the landed cost of each item and the order in which stock comes into each warehouse. When you fulfill a sales order for a customer, we automatically take the landed cost for each unit sold on a FIFO basis to calculate the exact COGS of each order.
For FIFO to work correctly, Finaloop needs historical purchases too, for example POs you created in a previous year but didn’t receive until the current year.
To see how to add historical POs, head over to Managing POs in Finaloop.
6. Manage vendors
In InventoryIQ, you'll be able to manage your balances owed to your inventory vendors.
To manage vendor balances:
To manage vendor balances:
To manage your vendor balances, navigate to Inventory>Purchases>Vendors. Here you'll see a list of all of your inventory vendors either from POs, Stock transfers, Assembly costs from your recipes or assemblies, or from bills or payments from your bank account or credit cards that were categorized into one of the inventory-related categories.
For each vendor, you'll see:
The rolling balance, which is the amount you owe the vendor if no bills were created from Bill.com, Settle, or in Finaloop.
It's calculated like this: POs + Stock transfers + Assembly costs - bills - payments to this vendor (excluding payments related to bills).
Unpaid bills, which is the amount you owe the vendor if a bill was created in Bill.com, Settle, or in Finaloop and was categorized into an inventory-related category.
You'll also see the total balances on top:

Click on a vendor to see the details.
Here you'll see 2 tabs: Rolling balance, and Bills.

Rolling balance
As you can see in the image above, the rolling balance is calculated like this:
POs + Stock transfers + Assembly costs - Bills - Payments not related to bills
If you see a negative vendor balance here, it is likely you are missing a PO, stock transfer, or assembly cost.
PO costs: These are the costs for the main vendor in a PO or for a vendor added in the Indirect costs section of the PO.
Stock transfer costs: These are costs for vendors added in the Allocated costs section of the stock transfer, such as shipping costs.
Assembly costs: These are dollar amounts added directly to product assemblies in the Additional costs section. When a product is assembled, these costs are added and increase your balance with the vendor.
Note: In the individual vendor page, you'll see assembly costs grouped by month to keep your view clean. Click “View details” to see the sources behind each amount.
Bills
On the Bills tab, you can see all Bills for this vendor that were synced from Bill.com or Settle or that you created in Finaloop. You'll also see any payments that were linked to the bills. Check out Managing your bills (payables) for more details.
Adding historical vendor payments
If you added a historical PO, and already paid a portion of the PO before the date you started with InventoryIQ, you'll need to add a historical payment as well so your vendor balance will be accurate.
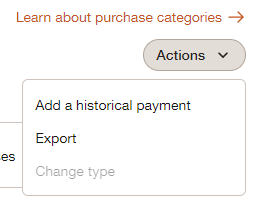
> To add an historical payment:
Navigate to Inventory>Purchases>Bills & Payments.
Click on Actions> Add a historical payment.
Add the payment date, amount, vendor, and category of the historical payment.
Click Save.
7. Update shipment statuses as orders progress
As orders progress, it’s important to update POs when you receive additional information regarding production and shipping.
To update shipment status:
To update shipment status:
When you enter the Production started date at the top of the PO, the status moves to ‘in process’ and we add the inventory to the Balance Sheet.
When you click +Add shipment in the PO and enter the warehouse and the shipping date, the PO shipment status moves to ‘In-transit’.
When you receive the goods, open the PO, click Mark as received, and enter the Received date. This moves the PO shipment status to ‘Received’.
To see the workflow steps related to status changes, head over to section Update PO shipment statuses in Managing your POs in Finaloop.
8. Add stock transfers between warehouses
If you transfer stock between warehouses (or from your warehouse/3PL to Amazon FBA), you'll need to add these transfers as well:
Go to the Inventory>Transfers tab and add stock transfers between warehouses.
Include any additional indirect costs (e.g., shipping) which will increase the real-time landed costs we track for each of the units in the receiving warehouse.
Note: Make sure to also include any historical transfers – transfers for inventory that were still in transit on your start date with InventoryIQ.

9. How to track & manage inventory
Using InventoryIQ you’ll find a wealth of information about each SKU. You’ll use the Products page to track and manage inventory.
Typically you’ll want to:
Track stock at the unit level
Review inventory data by warehouse
Add sales quantities for specific sales channels
Fix units with missing costs
You can see the information for each SKU in Finaloop on the Products page - either because we synced it from Shopify or Amazon, or because you added each SKU yourself.
Track stock at the unit level
Track stock at the unit level
Finaloop stores a stack of detail about each SKU - all available from the Products page.
On-hand units: Based on the opening balance plus units purchased, reduced by net units depleted.
Average cost / Unit: The average landed cost per unit of all on-hand units.
On-hand cost: The total landed cost of the on-hand units, based on the actual cost per unit (and not the average cost / unit) multiplied by the number of on-hand units.
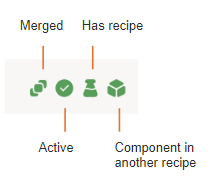
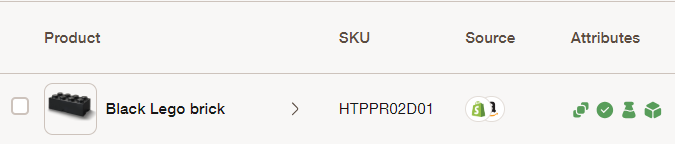
Unit attributes:
Merged: When it’s green, this SKU has been merged with another SKU.
Active: When green, it’s an active SKU, i.e., at least one unit In-transit / Purchased / Depleted /or has Opening balance.
Has recipe: When green, it shows it has a recipe or has been assembled.
Component in another recipe: When green, the product is a component in another recipe or assembly, such as multiple products in a bundle.
When you click More details, you also see more unit data:

Units In-transit
Unit opening balance
Units purchased
Net units depleted
Units on-hand
NOTE: Columns A+B+C equal the on-hand units

To see the unit breakdown for each product by warehouse, click the arrow > next to each SKU.

Review Inventory data by warehouse
Review Inventory data by warehouse
When you click into the specific products, you can see all the stock data for that product. When you click a SKU, Finaloops shows five tabs: Stock, Purchases, COGS, Recipes, Assemblies.
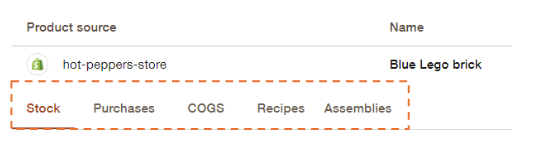
Here’s a summary of what’s on each tab (page).
Stock: Shows entries and exits of stock units for each of the warehouses at a specific date, fluctuating average cost per unit for each warehouse and the total on-hand cost in each warehouse.
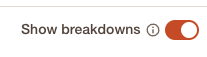
Purchases: Shows the cost and quantity detail for each PO as well as the FIFO (first-in-first-out) ladder. The POs are listed by date received since, when calculating COGS, we use costs from stock in the oldest layer. Once that stock layer is fully used, we take stock from the next PO, and so on.
You can also select Show breakdowns at the top to see more details.
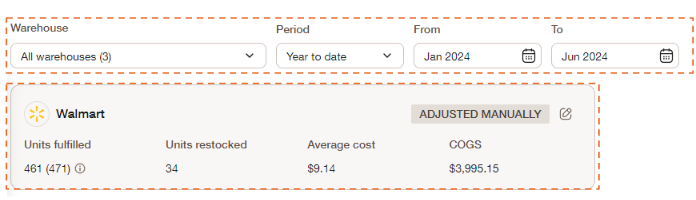
COGS: Shows the COGS calculation for the selected product for each sales channel. The tab also includes dead inventory, product giveaways, and product donations.
The COGS listed are the source for COGS in your P&L by each of your sales channels. If you sell on Shopify or Amazon, we record this automatically by syncing the sales data directly. For other channels, you can add the quantity data manually or bulk upload quantity changes and we’ll automatically calculate your COGS.
Recipes: Shows the SKUs or materials used in a recipe to create that specific SKU
Assemblies: Shows both on-demand and manual assemblies to create each unit assembled, average cost per unit, and total costs.
Add sales quantities for specific sales channels
Add sales quantities for specific sales channels
Finaloop automatically adds COGS for Shopify, Amazon, and any invoices sent through Finaloop. If you use other sales channels, you can add COGS manually either in a bulk upload or individually in each SKU.
Pro tip: Use the 'bulk unit edit' option described below to easily report dead inventory, product giveaways, or product donations across all relevant SKUs.
Here's how it works:
> To add COGS to sales channels in bulk:
Go to Products>Actions>Bulk unit edit.
Select the sales channel from the dropdown.
Select the method for calculating the adjustment.
Replace - Replaces the existing records for the selected product in the chosen month.
Add on-top - Adds the value to the total of existing records in the system.
Select the warehouse that fulfilled the sales from this sales channel from the dropdown.
Update the quantity of units fulfilled and restocked for each month. We'll report the adjustments in your books on the last day of the month.

You can also click on Actions>Import CSV file and file the instructions to add the quantities for all of your SKUs in one quick upload.
Note: you can duplicate the product from the right side of the row and add multiple months for each product at once.
> To add COGS to sales channels manually for each unit:
Navigate to Inventory>Products>selected product and click the COGS tab.

Select a warehouse from the dropdown.
Click Add to COGS and select the cost type: Sales channel, Dead inventory, Product giveaways, Product donations. A new pane opens.

Select the channel from the dropdown. For sales channels, select a specific channel or use ‘multi-channel’.
Click the Edit button. A side pane opens.
Expand the relevant month and update the quantity of units fulfilled and restocked on the relevant day of each month. Alternatively, you can add the totals for the month on the last day of the month.

For Shopify and Amazon: if you change quantities that we pull automatically, you can see the original quantity in the tooltip.
NOTE: If you select dead inventory, product giveaways, or product donations, Finaloop creates a new section (rectangle/box) for that category. To report additional costs in one of these categories, click on the edit icon in the relevant box, and report by month or date.
Click Save. Finaloop then calculates COGS using FIFO for the specific warehouse you selected.
It takes a moment or two for the screens to update showing the changes.
Go to the Inventory>COGS screen to see the COGS per channel, dead inventory, product giveaways, and product donations. You can also see the updated unit and cost data in the Inventory>Products screen.
Fix units with missing costs
Fix units with missing costs
If you see a negative value for on-hand units, this is because this product has units with missing costs. Typically, this is caused by no opening balance for that SKU or an incorrect balance, missing POs or transfers, or the quantity or date on a PO or transfer are inaccurate (an inaccurate date can create a time gap which may also result in units with missing costs).
To identify and fix the missing data, check out this article.
10. Additional tips to manage InventoryIQ
Reclassify some indirect inventory costs as incidentals
Reclassify some indirect inventory costs as incidentals
There are some indirect costs, like packaging paper to ship orders to customers, that aren’t strictly indirect inventory costs. If you have indirect costs that you don’t think should be reflected on a per unit basis, then you can reclassify them as ‘incidentals’. This removes the costs from inventory and moves them to COGS in your P&L. These won’t be included in calculating your landed costs per unit.
In order to reclassify these expenses:
1. Head over to Inventory>Purchases>Bills & Payments.
2. Select the specific transaction you want to reclassify and click Actions.
3. Select Change Type (purchases).
4. Select Incidental from the dropdown.
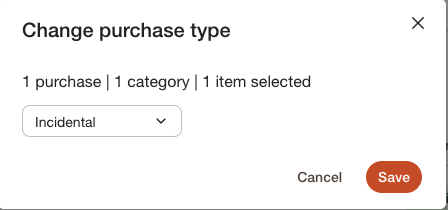
5. Click Save.
Note: There are certain types of transaction categorization that cannot be classified as incidentals, such a shipping. For specific categories that can't be changed to incidentals, you can also change the category in the Transactions screen to Other incidental supplies.
For more on incidentals, head over to the article Reporting purchases as incidentals.
Merge products
Merge products
Merging products allows you to group several products together under one ‘primary’ product.
This is a great feature if you have identical products from multiple sources, such as Amazon and Shopify, and you want to apply cost updates to both products at once.
> To merge products:
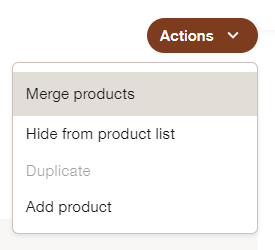
Navigate to Inventory>Products.
Select two or more products, click the Actions dropdown and select Merge products.
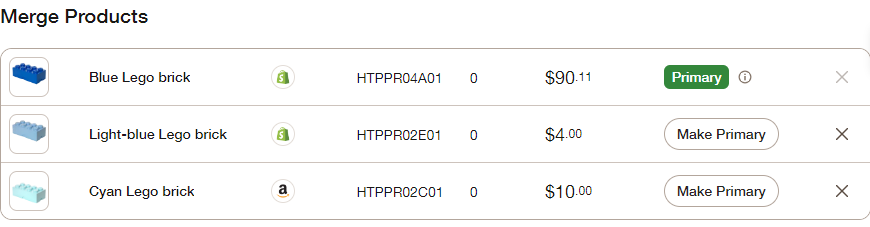
A new page opens showing the merged products. The first product you selected becomes the primary product.
You can add / remove products or make another product the primary product.
When you’re ready, click Save.
The products now show on the Products page as one product and the Merge Products icon will be green.
> To edit merged products:
To make changes, use the page filter and select Merged products.
Select the merged product.
Make the changes.
Click Save.
For more information on how to merge products and how they impact your financials, check out Merging multiple products.
Export purchases
Export purchases
To export a list of your inventory related bills and transactions from your banks and credit cards to .CSV, navigate to Inventory>Purchases>Bills & Payments.
Click Actions and select Export.
Manage recipes & assemblies
Manage recipes & assemblies
You can create and manage recipes, also known as a bill of materials, or assemblies using InventoryIQ.
Recipes are often used for brands that manufacture or produce their products from various components or raw materials or for bundles of multiple products.
Using recipes, you can create on-demand assemblies or you can create manual assemblies on an ‘as relevant’ basis. To learn more about creating and managing recipes and assemblies in InventoryIQ, see Managing your recipes and assemblies in Finaloop.
Manage dropshipping transactions
Manage dropshipping transactions
To learn more about how to manage your dropshipping transactions, check out this article.
Adjusting your inventory to match physical counts
Adjusting your inventory to match physical counts
Sometimes, when you conduct a physical count of your inventory in your warehouse, you may find some discrepancies between the units you have on-hand and the units you have recorded in Finaloop. No worries - the Physical Count Adjustment tool helps you reconcile your recorded inventory based on your physical stock count.
To learn more about how to record a physical count adjustment in InventoryIQ, check out this article.
11. Pricing for InventoryIQ
InventoryIQ is available as part of our Plus plan and it's price depends on the gross revenue of your business. You can see the price for your business on our pricing page.
To learn more about our pricing plans, check out Understanding my Finaloop subscription plan.