
1. About
Creating purchase orders (POs) is a crucial step in the production of accurate, real-time landed costs and the unit by unit management of COGS using Finaloop’s Inventory IQ.
This article will walk you through how to create, edit, and manage your POs in Finaloop.
2. Why POs are important for your COGS
Before we dive into the specific workflow to create a PO, it’s important to understand why the POs are so important for the calculation of your COGS and inventory. We also explain this in the article Inventory IQ: Everything you need to know.
InventoryIQ using the unit based COGS tracking method to track your COGS on a unit by unit basis using a FIFO method of accounting.
FIFO stands for first-in first-out. With each PO you create, Finaloop will automatically calculate a landed cost for that item. You can learn more about what landed cost is in the section on Landed Cost below.
When you sell a SKU, Finaloop uses the SKU’s landed cost from the PO with the earliest (oldest) date. When there is no more stock from that PO, Finaloop takes the costs from the next PO and so on - always starting from the first PO that you created for that item. In other words, the first item into the warehouse is the first item out. As you purchase items, the stock numbers and values in the Balance Sheet increase and when you sell, they decrease.
Example:
April 1: PO #0001. You purchase 10 items. Unit cost = $10.
May 12: PO #0026. You purchase 20 items. Unit cost = $10.50.
May 15: Sell 15 items.
InventoryIQ records this as a stock reduction of 15 units : 10 priced at $10 and 5 priced at $10.50.
Now that the importance of POs in InventoryIQ is clear, let's dive into creating and managing your POs in Finaloop.
3. Get familiar with the Purchases screen
You create POs from Inventory>Purchases>Purchase orders tab. After you create a PO, this screen shows all POs, with summary data for POs at different statuses. Of course, the numbers change when you apply filters by period, status, and/or vendor.
The screen has three sections.
Filters (#1)
Filters (#1)
Filter options:
Time period: e.g, today, last month, last quarter etc.
Date range: from and to
Search: enter text or a value
Filter: By amount, historical POs, Products
You can also filter by selecting a PO status (#2).
PO totals (#2)
PO totals (#2)
Total POs
POs by status
Placed
In process
Partially in process
Partially in transit
Received
Partially received
PO details (#3)
PO details (#3)
Here you can track the status of your POs, and open any PO to update/ edit.
4. Create inventory Purchase Orders (POs)
To create a PO to send to a vendor, we’ll work through the PO process, step by step, but first here are some important terms to understand:
Inventory PO terms
Inventory direct costs
Inventory direct costs
Inventory direct costs include costs directly related to the purchase or production of the actual inventory unit.
For resellers, this means the cost of the finished products you are purchasing from your vendor. For brands producing their own products, it includes raw materials and production costs.
Inventory indirect costs
Inventory indirect costs
Indirect costs include any additional costs incurred to get the inventory to your warehouse that are not related to the direct costs of the items themselves. Here’s the list of indirect cost types / categories:
Other inventory indirect costs / general
Shipping
Vendor fees
Duties and tax
Custom fees and services
Insurance
Allocated production costs
Pallet costs
Shipping surcharge
Vendor discounts
Note that if you have indirect costs that you don’t think should be reflected in your books as inventory costs, then you can reclassify them as ‘incidentals’. This removes the costs from inventory and moves them to COGS in your P&L. These won’t be included in calculating your landed costs per unit. For more on incidentals, head over to the article Reporting purchases as incidentals.
Landed cost
Landed cost
The landed cost tells you the exact cost each unit of a given SKU cost you. For each inventory item (SKU), the landed cost is the direct cost of inventory items purchased + indirect costs for those items / number of inventory items.
Here’s an example.
You purchase 100 units of Product A $2,000
Shipping and other indirect costs for those inventory items $500
The landed cost per unit is (2000+500)/100 $25
For more on landed costs, head over to How do I calculate my landed cost?
Creating a PO in Finaloop
How to create a PO
How to create a PO
Navigate to Inventory>Purchases>Purchase orders tab and click the +Purchase order button (top right). This opens the PO screen.
Complete these details:
PO name (#1): Name the PO by adding a number or title.
Placed date (#2): Enter the date you send the PO to the vendor (pending production). This date doesn’t have any impact on your books.
Production started date (#3): Enter the date the vendor confirms the PO. This is the date the items show as Inventory in process in the Balance Sheet. From that date, you have an obligation to pay your vendor for the order regardless of whether you've received the goods or an actual bill.
Vendor name (#4): You can enter text in the box to find the vendor.
Next, select the items and quantities. Click the Add items button to open the Add items pane. The screen shows a list of the SKUs that we synced from Shopify and Amazon.
If you are ordering inventory that isn’t in the list, for example, raw materials, click + to create a new product.
Select the items from the list and enter the quantity. Then click Add.
Now that your PO is updated with the specific items, add the direct costs for each item/unit.
Scroll down and enter the shipping costs to get the inventory to your warehouse.
To enter additional indirect costs, click + Indirect cost. A Select cost type dropdown opens to select the type of indirect cost.
Enter the value of the indirect cost. Repeat to add more indirect costs.
Finaloop does the hard work for you and automatically allocates the indirect costs per unit based on the direct costs and calculates the landed cost for each product. The landed cost is the direct cost per unit + shipping and other indirect costs per unit.
If you don’t want Finaloop to apportion indirect costs automatically, you can allocate them manually. Click the Calculator icon and set the Auto allocation toggle to OFF (ON by default). With auto-allocation OFF, you can allocate the indirect costs by another method such as, by weight or volume, just enter the allocation numbers next to each item.
Next add a Discount (optional): If there’s a discount, click +Discount and add it.
The summary section of the PO will look something like this.
Additional details (optional): Add an attachment or a note, such as special instructions. Both are visible to the vendor.
When you’ve reviewed the details, click Save.
That’s it. The PO is complete. Click Download (top right) to download the file to a pdf and then you can send it to the vendor.
Creating historical POs
Creating historical POs
If you have inventory that is in transit or in process on your start date of using InventoryIQ, you'll need to add these as POs and mark them with the relevant status.
When you add a PO with a production date before your start date in Finaloop, you'll see the small Historical PO shield (see image). This created an opening balance for your in process and in transit inventory.

5: Update the PO status
It’s important to update the PO status when you receive additional information regarding production and shipping.
Inventory transaction statuses
Inventory transaction statuses
In process: Inventory is marked as In process when you add a production date to your PO. The production date is the date the vendor confirmed your order and has started to process it. The Balance Sheet lists these items as ‘Inventory in process'.

In transit: The vendor has shipped the inventory but you haven’t yet received it. The Balance Sheet lists these items as ‘Inventory in transit’.
Received: When you mark a shipment as received, the Balance Sheet lists the items as ‘Inventory’.
A key component of how we calculate your COGS on a first-in first-out (FIFO) basis, is the accurate tracking of the inventory status and which units were received first.
Update the PO status to ‘In-process’
Update the PO status to ‘In-process’
Go to Inventory>Purchases>Purchase orders and click into the PO you want to update.
When the vendor confirms that the order is in progress, open the PO and enter the Production started date (#3).
This moves PO status to ‘In-process’ and the PO value shows in the Balance Sheet.
Update the shipment status to ‘In-transit’
Update the shipment status to ‘In-transit’
When your inventory is shipped, click + Add shipment to open the shipment pane and complete the relevant data.
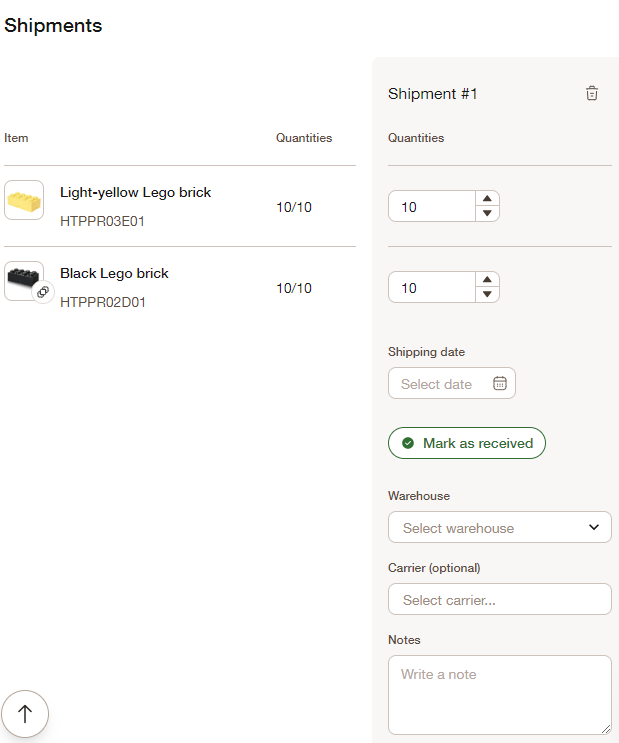
Quantities: Enter quantities included in the shipment. If everything is sent in one shipment, it will populate automatically.
Shipping date: Enter a date. On this date, inventory status changes from ‘Inventory in process’ to ‘Inventory in transit’ in the Balance Sheet.
Warehouse: Select from the dropdown.
Carrier (optional): Click in the search box to bring up existing carriers.
Notes: optional
To add additional shipments click the + Add shipment again.
Update the shipment status to ‘Received’
Update the shipment status to ‘Received’
To update the status to ‘Received’, click Mark as received when the shipment arrives at your warehouse.
6. Edit PO items or quantities
For any open year in Finaloop, POs are living documents, and you can edit them no matter their status. Any changes you make to the quantities or costs in the POs automatically update your landed costs and, ultimately, your COGS and inventory numbers.
To edit POs, just open the relevant PO, make the required changes, then click Save.